
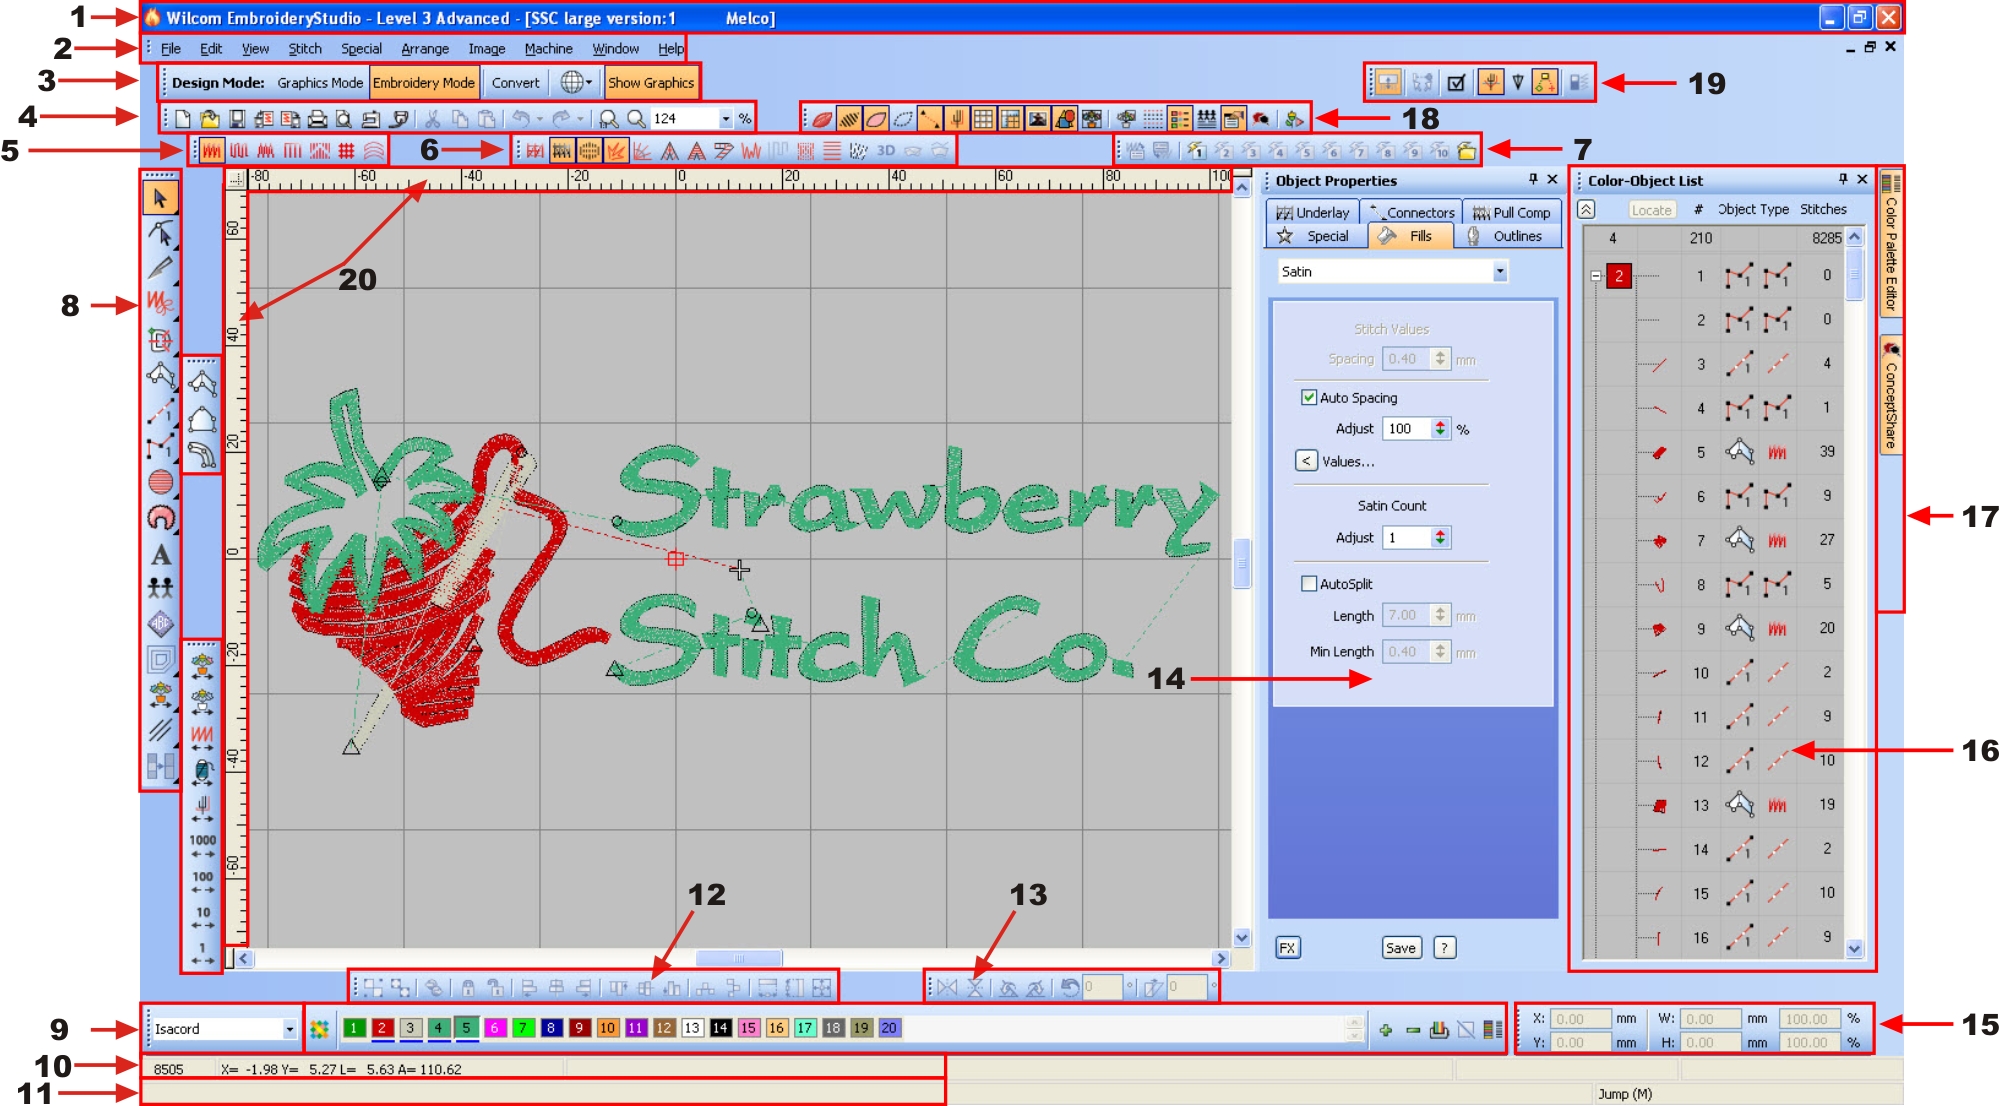
Welcome to the EDS ON LINE class assignment area.
In this area you will find class assignments that pertain to the Wilcom classes conducted on-line by the Embroidery Design School. Students are welcome to download assignments which pertain to their studies of CorelDraw taken through Strawberry Stitch Company's Embroidery Design School.
Completion of assignments is not a requirement of participating in class instruction. Class assignments are intended to supplement class time by providing the student either self-evaluation or instructor evaluation of their work performance.
At this time there are not additional fees for participating in this service and the Embroidery Design School encourages all students to participate.

Level
Beginner
Objective
- To provide practice of program layout.
Requirements
- To have attended the class Wilcom 1.1 in the past two weeks.
- An operational copy of Wilcom
- The ability to download any and all portions of the practice assignment.
Student duties
- Complete assignment without assistance
- Complete assignment within two weeks of attending the class.
Tasks
- Calibrate your computer's monitor as taught in class.
- Download the artwork provided (see below) and use the diagram to complete the assignment.
- Complete this on-line assignment using the diagram downloaded.
Downloads
- To download class assignment file
- Click on the link below
- When the image appears, Right-click on the displayed image
- Select "Save picture As" from the popup menu
- Select a location on your computer to save the file
- To download the associated file
Click here
Return to Menu

Level
Beginner
Objective
- To provide practice of program layout.
Requirements
- To have attended the class Wilcom 1.2 in the past two weeks.
- An operational copy of Wilcom
- The ability to download any and all portions of the practice assignment.
Student duties
- Complete assignment without assistance
- Complete assignment within two weeks of attending the class.
Tasks
- Study program layout diagram found below and prepare for class discussion.
- Complete this on-line assignment.
Downloads
- To download class assignment file
- Click on the link below
- When the image appears, Right-click on the displayed image
- Select "Save picture As" from the popup menu
- Select a location on your computer to save the file
- To download the associated file Click here
Return to Menu

Level
Beginner
Objective
- To provide practice of program layout.
Requirements
- To have attended the class Wilcom 1.3 in the past two weeks.
- An operational copy of Wilcom
Student duties
- Complete assignment without assistance
- Complete assignment within two weeks of attending the class.
Tasks
- Create a folder on your computer for savings access codes.
- Create the folder C:\Wilcom Backup
- Create the subfolder C:\Wilcom Backup\Access codes
- Move all previously received access codes into the subfolder named Access codes
- Complete this on-line assignment.
Return to Menu

Level
Beginner
Objective
- To provide practice of program layout.
Requirements
- To have attended the class Wilcom 1.4 in the past two weeks.
- An operational copy of Wilcom
Student duties
- Complete assignment without assistance
- Complete assignment within two weeks of attending the class.
Tasks
- Download the artwork provided (see below) and use the diagram to complete the assignment.
- Complete this on-line assignment.
Downloads
- To download class assignment file
- Click on the link below
- When the image appears, Right-click on the displayed image
- Select "Save picture As" from the popup menu
- Select a location on your computer to save the file
- To download the associated file Click here
Return to Menu

Level
Beginner
Objective
- To provide a refresher of Colorways and Thread color assignments.
Requirements
- To have attended the class Wilcom 1.5 in the past two weeks.
- An operational copy of Wilcom
Student duties
- Complete assignment without assistance
- Complete assignment within two weeks of attending the class.
Tasks
Return to Menu

Level
Beginner
Objective
- To provide a refresher of ways to select objects and view methods using the Color/Object list.
Requirements
- To have attended the class Wilcom 1.7 in the past two weeks.
- An operational copy of Wilcom
Student duties
- Complete assignment without assistance
- Complete assignment within two weeks of attending the class.
Tasks
Return to Menu

Level
Intermediate
Objective
- To demonstrate skills learned through module Wilcom 1.8
Requirements
- To have attended the class Wilcom 1.8 in the past two weeks.
- An operational copy of Wilcom
- The ability to download any and all portions of the assignment
Student duties
- Complete assignment without assistance
- Complete assignment within two weeks of attending the class.
- Save the file as Wilcom18CA.EMB and email using this link.
Tasks
- Complete this on-line assignment here.
- Follow the instructions below to complete the practical portion of the assignment class assignment
- Create a text item with the following properties.
- Text = Spring
- Alphabet = Block 2
- Baseline = Horizontal Free
- Letter height = 12.7mm
- Generate the stitches
- Create a text item with the following properties.
- Text = Go Mizzou!
- Alphabet = True Type font Arial
- Baseline = Horizontal Free
- Letter height = 25.4mm
- Do not generate the stitches
Return to Menu

Level
Intermediate
Objective
- To demonstrate skills learned through module Wilcom 1.9
Requirements
- To have attended the class Wilcom 1.9 in the past two weeks.
- An operational copy of Wilcom
- The ability to download any and all portions of the assignment
Student duties
- Complete assignment without assistance
- Complete assignment within two weeks of attending the class.
- Save the file as Wilcom19CA.EMB and email using this link.
Tasks
- There is not a questionnaire portion to this week's assignment.
- Follow the instructions below to complete the practical portion of the assignment class assignment
- Calibrate your monitor from within Wilcom
- Set your Grid to 1 inch or 25.4mm increments on both the Horizontal and Vertical axis
- Create a text item with the following properties.
- Text = Wilcom
- Alphabet = Block 2
- Baseline = Horizontal Free
- Letter height = 25.4mm (1 inch)
- Justification = Left
- Create a text item with the following properties.
- Text = March
- Alphabet = Italian script
- Baseline = Horizontal Fixed
- Baseline length = 200mm
- Letter height = 50.8mm (2 inches)
- Justification = Left
- Create a text item with the following properties.
- Text = Spring Time
- Alphabet = Small Block2
- Baseline = Arc CW
- Letter height = 8mm
- Justification = Center
Return to Menu

Level
Intermediate
Objective
- To demonstrate skills learned through module Wilcom 2.1
Requirements
- To have attended the class Wilcom 2.1 in the past two weeks.
- An operational copy of Wilcom
- The ability to download any and all portions of the assignment
Student duties
- Complete assignment without assistance
- Complete assignment within two weeks of attending the class.
- Sew the design on a knit or light woven
- Sew the design once on a tear away backing and a second time on a light cut away backing
- Save the file as Wilcom21CA.emb and email using this link
Tasks
- Create a text item with the following properties.
- Text = Strawberry
- Alphabet = Kabel
- Baseline = Horizontal Free
- Letter height = 12.7mm
- Letter spacing = 50% of letter height
- Size the "S" in Strawberry to 19mm
- Create a text item with the following properties.
- Text = Festival
- Alphabet = Italian Script
- Baseline = Horizontal Fixed
- Baseline Length = 300mm
- Letter height = 25.4mm
- Justification = Left
- Create a text item with the following properties.
- Text = 1992 - 2006
- Alphabet = Karin script
- Baseline = Horizontal Free
- Letter spacing = 5%
- Letter height = 25.4mm
- Stitch spacing = Auto-spacing 80%
Return to Menu

Level
Intermediate
Objective
- To demonstrate skills learned through module Wilcom 2.4
Requirements
- To have attended the class Wilcom 2.4 in the past two weeks.
- An operational copy of Wilcom
- The ability to download any and all portions of the assignment
Student duties
- Complete assignment without assistance
- Complete assignment within two weeks of attending the class.
- Sew the design on a knit or light woven
- Sew the design once on a tear away backing and a second time on a light cut away backing
- Save the file as Wilcom241CA.DST and Wilcom242CA.DST file and email using this link
Tasks
- Create a text team name file using the included file TeamName1.txt
- Use Name1 field only
- Alphabet = Block2
- Baseline = Horizontal Fixed
- Letter height = 25.4mm
- Baseline length = 50mm
- Set �To Fit Text, use Width
- Save the design as Team name only, with stops � Follow Auto Start/End Menu
- Save the design as TeamNameCA241.DST
- Create a text team name file using the included file TeamName1.txt
- Open any design you have available
- Use Name1 and Name2 fields only
- Alphabet = Block2
- Baseline = Horizontal Fixed
- Baseline length = 80mm
- Letter height = 12.7mm
- Justification = Left
- Set �To Fit Text, use Size
- Save the design as Design and Team names, with stops
- Save the design as TeamNameCA242.DST
Downloads
- To download class practical assignment file
- Click on the download link below
- When asked, select Run
- When asked about security verification, select Run
- Accept the license agreement by selecting Yes
- The file TeamName1.txt will be saved in the C:\EDSOnLine folder once you select Unzip
- You will receive the message 1 file(s) unzipped successfully
- If the self-extracting program does not close automatically, select Close
- Use Windows Notepad to open the downloaded file.
- To download the associated art files Click here
Return to Menu

Level
Intermediate
Objective
- To provide a refresher of Pull compensation, Column width, Stitch shortening and Fractional spacing.
Requirements
- To have attended the class Wilcom 2.8 in the past two weeks.
- An operational copy of Wilcom
Student duties
- Complete assignment without assistance
- Complete assignment within two weeks of attending the class.
Tasks
Return to Menu

Level
Intermediate
Objective
- To demonstrate skills learned through module Wilcom 2.9
Requirements
- To have attended the class Wilcom 2.9 in the past two weeks.
- An operational copy of Wilcom
- The ability to download any and all portions of the assignment
Student duties
- Complete assignment without assistance
- Complete assignment within two weeks of attending the class.
- Save the file as Wilcom291CA.emb, Wilcom292CA.emb and Wilcom293CA.emb file and email in a single message using this link.
Tasks
2.9.1
- Download the file Wilcom29CA.emb
- See Download instructions below
- Create a text object for White pique with Black thread
- Text = Embroidery Design School
- Alphabet = Small Block 2
- Lettering height = 6mm
- Baseline = Arc clockwise
- Placement = Above the ellipse
- Use all upper case
- Text = Established 2000
- Alphabet = Small Block 1
- Lettering height = 5mm
- Baseline = Arc counterclockwise
- Placement = Below the ellipse
- Use mixed case
- Save design as WilcomCA291.emb
2.9.2
- Create a text object for Navy fleece with Red thread
- Text = Elizabeth
- Alphabet = Script of your choice
- Baseline = Horizontal Fixed
- Baseline = 89mm
- Letter height = 19mm
- Save design as WilcomCA292.emb
2.9.3
- Create a text object for Red fleece
- Text = Your first name on line one and last name on a second line
- Alphabet = Block2
- Baseline = Free line
- Letter height = 25mm,however total object height = 2.25" high
- Stitch Sequence
Right to Left
Bottom to Top
Reverse direction between lines
- Stitches = Satin
- Density = Autospacing = 80%
- Underlay 1
- Edge run
- Stitch length = 2.0mm
- Variable run length = On, Minimum = 1.0, Cord gap = .07
- Margin = .30
- Underlay 2
- Double Zig Zag
- Spacing = 2.0mm
- Stitch Length = 12.7mm
- Margin = 0.0
- Pull compensation = .25mm
- Column width = .15mm
- Short Stitches = On
- Save design as WilcomCA293.emb
Downloads
- To download class practical assignment file
- Click on the download link below
- When asked, select Run
- When asked about security verification, select Run
- Accept the license agreement by selecting Yes
- The file Wilcom29CA.exe will be saved in the C:\EDSOnLine folder once you select Unzip
- You will receive the message 1 file(s) unzipped successfully
- If the self-extracting program does not close automatically, select Close
- To download the associated files Click here
Return to Menu

Level
Intermediate
Objective
- To demonstrate skills learned through module Wilcom 3.1
Requirements
- To have attended the class Wilcom 3.1 in the past two weeks.
- An operational copy of Wilcom
- The ability to download any and all portions of the assignment
Student duties
- Complete assignment without assistance
- Complete assignment within two weeks of attending the class.
- Save the file as Wilcom31CA.emb and email using
this link
Tasks
- Complete this on-line assignment here.
- Follow the instructions below to complete the practical portion of the assignment class assignment
- Insert the vector art (see download instructions below)
- Create a Run stitch object using Figure A.
- Assign a Stitch length 4.0 mm
- Turn Variable Run Length off
- Create a Run stitch object using Figure B.
- Assign a Stitch length 4.0 mm
- Turn Variable Run Length on, Min. Length = 1.0 mm, Chord Gap = .10 mm
- Create a Triple Run stitch object using Figure C.
- Assign a Stitch length 3.5mm
Downloads
- To download class practical assignment file
- Click on the download link below
- When asked, select Run
- When asked about security verification, select Run
- Accept the license agreement by selecting Yes
- The file Wilcom31CA.cdr will be saved in the C:\EDSOnLine folder once you select Unzip
- You will receive the message 1 file(s) unzipped successfully
- If the self-extracting program does not close automatically, select Close
- Insert the art file of your choice (from the three files unzipped) in your embroidery software as normal.
- To download the associated art files Click here
Return to Menu

Level
Intermediate
Objective
- To demonstrate skills learned through module Wilcom 3.2
Requirements
- To have attended the class Wilcom 3.2 in the past two weeks.
- An operational copy of Wilcom
- The ability to download any and all portions of the assignment.
Student duties
- Complete assignment without assistance
- Complete assignment within two weeks of attending the class.
- Save the file as Wilcom32CA.emb and email using this link
Tasks
- Complete this on-line assignment here.
- Follow the instructions below to complete the practical portion of the assignment class assignment.
- Insert the vector art (see download instructions below)
- Create a C-Input object using Figure A.
- Assign a stitch type of ZigZag
- Assign a Pull compensation of .25 mm
- Create a C-Input object using Figure B.
- Assign a Stitch type of Stain
- Assign an Edge run underlay, Margin = .2 mm, Stitch Length = 2.5mm
- Create a Back Stitch object using Figure C.
- Assign a Stitch length 3.5mm
- Min. Length = 1.0 mm
- Overlap = 70%
- Strokes = 3
- Create a Stem Stitch object using Figure D.
- Thickness = 1.75 mm
- Spacing = 2.0 mm
- Angle = 90
- Type = Triple
- Thickness = .15 mm
Downloads
- To download class practical assignment file
- Click on the download link below
- When asked, select Run
- When asked about security verification, select Run
- Accept the license agreement by selecting Yes
- The file Wilcom32CA.cdr will be saved in the C:\EDSOnLine folder once you select Unzip
- You will receive the message 1 file(s) unzipped successfully
- If the self-extracting program does not close automatically, select Close
- Insert the art file of your choice (from the three files unzipped) in your embroidery software as normal.
- To download the associated art files Click here
Return to Menu

Level
Intermediate
Objective
- To demonstrate skills learned through module Wilcom 3.3
Requirements
- To have attended the class Wilcom 3.3 in the past two weeks.
- An operational copy of Wilcom
- The ability to download any and all portions of the assignment
Student duties
- Complete assignment without assistance
- Complete assignment within two weeks of attending the class.
- Save the file as Wilcom33CA.emb and email using this link
Tasks
- Insert the vector art (see download instructions below)
- Create Input A object using Figures A.
- Assign a stitch type of Satin
- Assign a Pull compensation of .25 mm
- Create Input B object using Figures B.
- Assign a Stitch type of Stain
- Create Complex Fill object using Figures C.
- Assign a Stitch type of Tatami
- Stitch length = 3.5mm
- Stitch spacing = 1.5
Downloads
- To download class pratical assignment file
- Click on the download link below
- When asked, select Run
- When asked about security verification, select Run
- Accept the license agreement by selecting Yes
- The file Wilcom33CA.cdr will be saved in the C:\EDSOnLine folder once you select Unzip
- You will receive the message 1 file(s) unzipped successfully
- If the self-extracting program does not close automatically, select Close
- Insert the art file of your choice (from the three files unzipped) in your embroidery software as normal.
- To download the associated art files Click here
Return to Menu

Level
Intermediate
Objective
- To demonstrate skills learned through module Wilcom 3.4
Requirements
- To have attended the class Wilcom 3.4 in the past two weeks.
- An operational copy of Wilcom
- The ability to download any and all portions of the assignment
Student duties
- Complete assignment without assistance
- Complete assignment within two weeks of attending the class.
- Save the file as Wilcom34CA.emb and email using this link
Tasks
- Insert the vector art (see download instructions below)
- Create Fusion Fill object using Figure A.
- Assign a stitch type of Satin
- Assign a Pull compensation of .15 mm
- Assign a Edge Run underlay.
- Create Fusion Fill object using Figures B.
- Assign a Stitch type of Stain
- Assign a Pull compensation of .35 mm
- Assign a Double ZigZag underlay.
Downloads
- To download class practical assignment file
- Click on the download link below
- When asked, select Run
- When asked about security verification, select Run
- Accept the license agreement by selecting Yes
- The file Wilcom34CA.cdr will be saved in the C:\EDSOnLine folder once you select Unzip
- You will receive the message 1 file(s) unzipped successfully
- If the self-extracting program does not close automatically, select Close
- Insert the art file of your choice (from the three files unzipped) in your embroidery software as normal.
- To download the associated art files Click here
Return to Menu

Level
Intermediate
Objective
- To demonstrate skills learned through module Wilcom 3.5
Requirements
- To have attended the class Wilcom 3.6 in the past two weeks.
- An operational copy of Wilcom
- The ability to download any and all portions of the assignment
Student duties
- Complete assignment without assistance
- Complete assignment within two weeks of attending the class.
- Sew the design on a knit or light woven
- Sew the design once on a tear away backing and a second time on a light cut away backing
- Save the file as Wilcom36CA.emb and email using this link
Tasks
- Insert the bitmap art (see download instructions below)
- Create a Complex fill for the white background area of the design.
- Assign an Edge run underlay, Stitch length 2.5mm, Margin = .50
- Assign a Tatami underlay, Density=3.0mm, Stitch length 4.0mm, Margin = .20
- Create the outer red border using Input A.
- Assign Double Zigzag underlay, Density = 3.0mm, Margin 1 = 0
- Create the inside red border using Input C.
- Assign Edge run underlay, Margin 1 = .40, Stitch Length = 3.0mm
- Sew the design out as follows
- On a knit or thin woven fabric
- Once with Tear away backing and once on light weight cut away backing
- Scan the sew out with the cut away backing and email it along with the design in .EMB format using the email link above.
Downloads
- To download class assignment file
- Click on the link below
- When the image appears, Right-click on the displayed image
- Select "Save picture As" from the popup menu
- Select a location on your computer to save the file
- To download the associated file Click here
Return to Menu

Level
Intermediate
Objective
- To demonstrate skills learned through module Wilcom 3.6
Requirements
- To have attended the class Wilcom 3.7 in the past two weeks.
- An operational copy of Wilcom
- The ability to download any and all portions of the assignment
Student duties
- Complete assignment without assistance
- Complete assignment within two weeks of attending the class.
- Sew the design on a knit or light woven
- Sew the design once on a tear away backing and a second time on a light cut away backing
- Save the file as Wilcom37CA.emb and email using this link
Tasks
- Insert the vector art (see download instructions below)
- Color the vector art orange
- Lock the vector art
- Create a Complex fill for the white background area of the design.
- Assign an Edge run underlay, Stitch length 2.5mm, Margin = .50
- Assign a Tatami underlay, Density=3.0mm, Stitch length 4.0mm, Margin = .20
- Create the outer and inner red border using Input C.
- Assign Edge run underlay, Margin 1 = .40, Stitch Length = 3.0mm
- Assign Double Zigzag underlay, Density = 3.0mm, Margin 1 = 0
- Create the text "MISSOURI" using the Alphabet tool. Do not use a TrueType Alphabet.
- Assign an Edge run underlay, Stitch length 2.5mm, Margin = .50
- Assign a Stitch direction from right to left
- Create the text "St. Louis" using the Alphabet tool. Do not use a TrueType Alphabet.
- Assign an Center run underlay, Stitch length 2.0mm
- Assign a Stitch direction from left to right
- Create the text "Strawberry Stitch Co." using the Alphabet tool. Do not use a TrueType Alphabet.
- Assign an Edge run underlay, Stitch length 2.5mm, Margin = .50
- Assign a Stitch direction from right to left
- Create the text "Est. 1992" using the Alphabet tool. Do not use a TrueType Alphabet.
- Assign an Edge run underlay, Stitch length 2.0mm, Margin = .30
- Assign a Stitch direction from left to right
- Scan the sew out with the cut away backing and email it along with the design in .EMB format using the email link above
Downloads
- To download class assignment file
- Click on the download link below
- When asked, select Run
- When asked about security verification, select Run
- Accept the license agreement by selecting Yes
- The file WilcomCA37.cdr will be saved in the C:\EDSOnline folder once you select Unzip
- You will receive the message 1 file(s) unzipped successfully
- If the self-extracting program does not close automatically, select Close
- Insert the file in Wilcom as normal
- To download the associated file Click here
Return to Menu

Level
Intermediate
Objective
- To demonstrate skills learned through module Wilcom 3.7
Requirements
- To have attended the class Wilcom 3.8 in the past two weeks.
- An operational copy of Wilcom
- The ability to download any and all portions of the assignment
Student duties
- Complete assignment without assistance
- Complete assignment within two weeks of attending the class.
- Sew the design on a knit or light woven
- Sew the design once on a light cut away backing
- Save the file as Wilcom38CA.emb and email using this link
Tasks
- Insert the vector art (see download instructions below)
- Color the vector art red
- Lock the vector art
- Complete the steps of assignment Wilcom 3.7 (see above)
- Create the text "Missouri" using Input A and Run stitch tool
- Create the text from right to left
- Create manual edge run underlay using the Run stitch tool
- Assign a stitch length of 2.5mm
- Assign a Pull compensation of .20mm
- Create the text "St. Louis" using Input A and Run stitch tool
- Create the text from left to right
- Create manual edge run underlay using the Run stitch tool
- Assign a stitch length of 2.0mm
- Assign a Pull compensation of .25mm
- Omit the text "Strawberry Stitch Co." and "Est. 1992"
- Scan the sew out with the cut away backing and email it along with the design in .EMB format to the address above.
Downloads
- To download class assignment file
- Click on the download link below
- When asked, select Run
- When asked about security verification, select Run
- Accept the license agreement by selecting Yes
- The file WilcomCA37.cdr will be saved in the C:\EDSOnline folder once you select Unzip
- You will receive the message 1 file(s) unzipped successfully
- If the self-extracting program does not close automatically, select Close
- Insert the file in Wilcom as normal
- To download the associated file Click here
Return to Menu

Level
Intermediate
Objective
- To demonstrate skills learned through module Wilcom 3.8
Requirements
- To have attended the class Wilcom 3.9 in the past two weeks.
- An operational copy of Wilcom
- The ability to download any and all portions of the assignment
Student duties
- Complete assignment without assistance
- Complete assignment within two weeks of attending the class.
- Sew the design on a knit or light woven
- Sew the design once on a light cut away backing
- Save the file as Wilcom39CA.emb and email using this link
Tasks
- Insert the vector art (see download instructions below)
- Color the vector art bright green
- Lock the vector art
- Complete the steps of assignment Wilcom 3.8 (see above)
- Create the text "Strawberry Stitch Co." using Input A and Run stitch tool
- Create the text from right to left
- Assign edge run underlay using the auto-underlay
- Assign a stitch length of 2.5mm
- Assign a Pull compensation of .20mm
- Create the text "Est. 1992" using Input A and Run stitch tool
- Create the text from left to right
- Assign edge run underlay using the auto-underlay, Margin 1 = .40, Stitch Length = 2.5mm
- Assign double zigzag underlay using the auto-underlay, Density = 2.0mm, Margin 1 = 0
- Assign a Pull compensation of .25mm
- Path the design as explained in class 3.9
- Construct the letters as described in class
- Apply connectors as described in class
- Scan the sew out with the cut away backing and email it along with the design in .EMB format to the address above.
Downloads
- To download class assignment file
- Click on the download link below
- When asked, select Run
- When asked about security verification, select Run
- Accept the license agreement by selecting Yes
- The file WilcomCA37.cdr will be saved in the C:\EDSOnline folder once you select Unzip
- You will receive the message 1 file(s) unzipped successfully
- If the self-extracting program does not close automatically, select Close
- Insert the file in Wilcom as normal
- To download the associated file Click here
Return to Menu

Level
Intermediate
Objective
- To demonstrate skills learned through module Wilcom 3.9
Requirements
- To have attended the class Wilcom 4.1 in the past two weeks.
- An operational copy of Wilcom
- The ability to download any and all portions of the assignment
Student duties
- Complete assignment without assistance
- Complete assignment within two weeks of attending the class.
- Sew the design on a knit or light woven
- Sew the design once on a light cut away backing
- Save the file as Wilcom41CA.emb and email using this link
Tasks
- Insert the vector art (see download instructions below)
- Size the vector art to 93mm height and width
- Color the vector art bright green
- Lock the vector art
- Complete the steps of assignment Wilcom 3.9 (see above)
- Using Auto Start and End, align the design
- Using Digitize Auto Start/End Point
- Centered on Vertical plane
- 6 mm below the design on the Horizontal plane
- Create a new colorway
- Assign any Colorway name you would like
- Assign colors as follows
- Background fill - Isacord White 0010
- Outside rings - Isacord Red 1902
- Text "Strawberry Stitch Co." and "Est. 1992" - Isacord Black 0020
- Text "St. Louis Missouri" - Isacord Grey 0108
- Save the design
- First as an .EMB file
- Second as a .DST file
- Attach both designs in the same email
Downloads
- To download class assignment file
- Click on the download link below
- When asked, select Run
- When asked about security verification, select Run
- Accept the license agreement by selecting Yes
- The file WilcomCA37.cdr will be saved in the C:\EDSOnline folder once you select Unzip
- You will receive the message 1 file(s) unzipped successfully
- If the self-extracting program does not close automatically, select Close
- Insert the file in Wilcom as normal
- To download the associated file Click here
Return to Menu

Level
Intermediate
Objective
- To demonstrate skills learned through module Wilcom 4.1
Requirements
- To have attended the class Wilcom 4.2 in the past two weeks.
- An operational copy of Wilcom
- The ability to download any and all portions of the assignment
Student duties
- Complete assignment without assistance
- Complete assignment within two weeks of attending the class.
- Sew the design on a knit or light woven
- Sew the design once on a light cut away backing
- Save the file as Wilcom42CA.emb and email using this link
Tasks
- Insert the vector art (see download instructions below)
- Size the vector art to 93mm height and width
- Color the vector art bright green
- Lock the vector art
- Create a Complex fill for the white background area of the design.
- Assign a stitch length of 3.5mm
- Assign a stitch spacing of .38mm
- Assign an Edge run underlay, Stitch length 2.5mm, Margin = .50
- Assign a Tatami underlay, Density=3.0mm, Stitch length 4.0mm
- Create the borders using Input C. If you do not have Input C, use Input A
- Assign Edge run underlay, Margin 1 = .40, Stitch Length = 3.0mm
- Assign Double Zigzag underlay, Density = 3.0mm, Margin 1 = 0
- Create the text "Strawberry Stitch Co." using the Alphabet tool
- Modify the letters to match the art
- Assign an Edge run underlay, Stitch length 2.5mm, Margin = .50
- Assign a Stitch direction from right to left
- Assign connector properties to trim between words but not between letters
- Create the text "Est. 1992" using the Alphabet tool
- Modify the letters to match the art
- Assign an Edge run underlay, Stitch length 2.0mm, Margin = .30
- Assign a Stitch direction from left to right
- Assign connector properties to trim between words but not between letters
- Create the text "St. Louis" using Input A and Run stitch tool
- Create the text from left to right
- Create manual center run underlay using the Run stitch tool
- Assign a stitch length of 2.0mm
- Assign a Pull compensation of .25mm
- Create the text "Missouri" using Input A and Run stitch tool
- Create the text from right to left
- Create manual edge run underlay using the Run stitch tool
- Assign a stitch length of 2.5mm
- Assign a Pull compensation of .20m
- Using Auto Start and End, center the design
- Centered on the Horizontal and Vertical plane
- Create a new colorway
- Assign any Colorway name you would like
- Assign colors as follows
- Background fill - Isacord White 0010
- Outside rings - Isacord Red 1902
- Text "Strawberry Stitch Co." and "Est. 1992" - Isacord Black 0020
- Text "St. Louis Missouri" - Isacord Grey 0108
- Save the design
- First as an .EMB file
- Second as a .DST file
- Attach both designs in the same email
Downloads
- To download class assignment file
- Click on the download link below
- When asked, select Run
- When asked about security verification, select Run
- Accept the license agreement by selecting Yes
- The file WilcomCA37.cdr will be saved in the C:\EDSOnline folder once you select Unzip
- You will receive the message 1 file(s) unzipped successfully
- If the self-extracting program does not close automatically, select Close
- Insert the file in Wilcom as normal
- To download the associated file Click here
Return to Menu

Level
Advanced
Objective
- To demonstrate skills learned through module Wilcom 4.3
Requirements
- To have attended the class Wilcom 4.3 in the past two weeks.
- An operational copy of Wilcom
- The ability to download any and all portions of the assignment
Student duties
- Complete assignment without assistance
- Complete assignment within two weeks of attending the class.
- Save the file as Wilcom43CA.emb and email using this link
Tasks
- Insert the art (see download instructions below)
- Using the top shape create an Input A object with a Contour stitch.
- Assign a stitch length of 3.5mm
- Assign a stitch spacing of .38mm
- Using the middle shape create a Complex Fill object with a Tatami Stitch and a Florentine effect.
- Use the Red line to create the Stitch Angle Guideline
- Assign a density of .39mm
- Assign a stitch length of 3.2mm
- Assign a Nominal Effect
- Using the bottom shape create a Complex Fill object with a Tatami Stitch and a Liquid effect.
- Use the Red lines to create the Stitch Angle Guidelines
- Assign a density of .37mm
- Assign a stitch length of 3.4mm
- Assign a Maximum Effect
Downloads
- To download class assignment file
- Click on the download link below
- When asked, select Run
- When asked about security verification, select Run
- Accept the license agreement by selecting Yes
- The files WilcomCA43.cdr, WilcomCA43.jpg and WilcomCA43.eps will be saved in the C:\EDSOnline folder once you select Unzip
- You will receive the message 3 file(s) unzipped successfully
- If the self-extracting program does not close automatically, select Close
- Insert the file in Wilcom as normal
- To download the associated file Click here
Return to Menu

Level
Advanced
Objective
- To demonstrate skills learned through module Wilcom 4.4
Requirements
- To have attended the class Wilcom 4.4 in the past two weeks.
- An operational copy of Wilcom
- The ability to download any and all portions of the assignment
Student duties
- Complete assignment without assistance
- Complete assignment within two weeks of attending the class.
- Save the file as Wilcom44CA.emb and email using this link
Tasks
- Insert the art (see download instructions below)
- Using the top shape create a Custom Program split pattern.
- Name the Custom Program Split pattern "Sheet".
- Using the bottom shape create a Complex Fill object with a Program Split.
- Assign the Sheet pattern
- Assign Combination of Satin in Tatami
- Assign a Column spacing of 10mm
- Assign a Row spacing of 10mm
Downloads
- To download class assignment file
- Click on the download link below
- When asked, select Run
- When asked about security verification, select Run
- Accept the license agreement by selecting Yes
- The file WilcomCA44.cdr will be saved in the C:\EDSOnline folder once you select Unzip
- You will receive the message 1 file(s) unzipped successfully
- If the self-extracting program does not close automatically, select Close
- Insert the file in Wilcom as normal
- To download the associated file Click here
Return to Menu

Level
Advanced
Objective
- To demonstrate skills learned through module Wilcom 4.5
Requirements
- To have attended the class Wilcom 4.5 in the past two weeks.
- An operational copy of Wilcom
- The ability to download any and all portions of the assignment
Student duties
- Complete assignment without assistance
- Complete assignment within two weeks of attending the class.
- Save the file as Wilcom45CA.emb and email using this link
Tasks
- Insert the art (see download instructions below)
- Using shape A create a Motif Fill to include the hole.
- Select the Motif pattern Heart01
- Set Column Spacing to = 10mm
- Set Row Spacing to = 7 mm
- Set Row Offset to = 5 mm
- Turn off Scale to fit Grid
- Turn on Clip to fit Shape
- Using shape B create a Motif Run
- Select the Two Part Motif pattern Duet10a
- Set Size X to = 10 mm
- Set Size Y to = 5 mm
- Set Spacing to = 10 mm
- Use reshape to adjust pattern spacing so individual patterns meet one another
- Using shape C create a Motif Run
- Select the Single Motif pattern Kite02
- Leave Size X and Y to default size
- Leave Spacing to default distance
- Turn on Keep First Motif
- Turn off Keep Last Motif
- Use Reshape to adjust a smooth flow of the Motif pattern at the acute angles.
Downloads
- To download class assignment file
- Click on the download link below
- When asked, select Run
- When asked about security verification, select Run
- Accept the license agreement by selecting Yes
- The file WilcomCA45.cdr will be saved in the C:\EDSOnline folder once you select Unzip
- You will receive the message 1 file(s) unzipped successfully
- If the self-extracting program does not close automatically, select Close
- Insert the file in Wilcom as normal
- To download the associated file Click here
Return to Menu

Level
Advanced
Objective
- To demonstrate skills learned through module Wilcom 4.6
Requirements
- To have attended the class Wilcom 4.6 in the past two weeks.
- An operational copy of Wilcom
- The ability to download any and all portions of the assignment
Student duties
- Complete assignment without assistance
- Complete assignment within two weeks of attending the class.
- Save the file as Wilcom46CA.emb and email using this link
Tasks
- Insert the art (see download instructions below)
- Using Figure A create a Motif pattern.
- Save the Motif pattern as SSC01
- Use the crosses at each side as the reference points
- Using Figure B create a Motif Fill without a hole
- Apply the Motif pattern SSC01
- Apply 3D Warp to the Motif Fill
- Reshape the Warp region to match the oval shape found within the boundary of the Motif Fill
- Using Figure C create a Motif Run
- Select the Single Motif pattern SSC01
- Leave Size X and Y to default size
- Set the Spacing to 6.5 mm
Downloads
- To download class assignment file
- Click on the download link below
- When asked, select Run
- When asked about security verification, select Run
- Accept the license agreement by selecting Yes
- The file Wilcom46CA.cdr will be saved in the C:\EDSOnline folder once you select Unzip
- You will receive the message 1 file(s) unzipped successfully
- If the self-extracting program does not close automatically, select Close
- Insert the file in Wilcom as normal
- To download the associated file Click here
Return to Menu

Level
Advanced
Objective
- To demonstrate skills learned through module Wilcom 4.7
Requirements
- To have attended the class Wilcom 4.7 in the past two weeks.
- An operational copy of Wilcom
- The ability to download any and all portions of the assignment
Student duties
- Complete assignment without assistance
- Complete assignment within two weeks of attending the class.
- Save the file as Wilcom47CA.emb and email using this link
Tasks
- Insert the art (see download instructions below)
- Using Figure A create a Branched object using the Run stitch tool.
- Begin the Branched object at the In Arrow
- End the Branched object at the Out Arrow
- Using Figure B create a Branched object using the Input A tool
- Begin the Branched object at the In Arrow
- End the Branched object at the Out Arrow
- Using Figure C create a Input C object
- Create the object at a 75 degree angle
- Apply Smart Corners
- Enter a Mitre Below value of 80 degrees
- Enter a Overlap value of 1.0mm
- Using Figure D create a Input C object
- Create the object at a 30 degree angle
- Apply Smart Corners
- Check on Cap Corner
- Enter a Cap Below value of 45 degrees
Downloads
- To download class assignment file
- Click on the download link below
- When asked, select Run
- When asked about security verification, select Run
- Accept the license agreement by selecting Yes
- The file Wilcom47CA.cdr will be saved in the C:\EDSOnline folder once you select Unzip
- You will receive the message 1 file(s) unzipped successfully
- If the self-extracting program does not close automatically, select Close
- Insert the file in Wilcom as normal
- To download the associated file Click here
Return to Menu

Level
Advanced
Objective
- To demonstrate skills learned through module Wilcom 4.9
Requirements
- To have attended the class Wilcom 4.9 in the past two weeks.
- An operational copy of Wilcom
- The ability to download any and all portions of the assignment
Student duties
- Complete assignment without assistance
- Complete assignment within two weeks of attending the class.
- Save the file as Wilcom49CA.emb and email using this link
Tasks
- Insert the art (see download instructions below)
- Using Figure A create a Complex Fill with a Tatami Stitch type.
- Apply an Accordion Spacing effect to the complex fill
- Minimum spacing = .38mm
- Maximum spacing = 3.5mm
- Using Figure B create a Complex Fill with a Tatami Stitch type.
- Apply a Color Blending effect to the complex fill
- Top layer
- Select a Linear Profile
- Minimum spacing = .42mm
- Maximum spacing = 4.0mm
- Bottom layer
- Select the Constant Profile
Downloads
- To download class assignment file
- Click on the download link below
- When asked, select Run
- When asked about security verification, select Run
- Accept the license agreement by selecting Yes
- The file Wilcom49CA.cdr will be saved in the C:\EDSOnline folder once you select Unzip
- You will receive the message 1 file(s) unzipped successfully
- If the self-extracting program does not close automatically, select Close
- Insert the file in Wilcom as normal
- To download the associated file Click here
Return to Menu

Level
Advanced
Objective
- To demonstrate skills learned through module Wilcom 5.2
Requirements
- To have attended the class Wilcom 5.2 in the past two weeks.
- An operational copy of Wilcom
- The ability to download any and all portions of the assignment
Student duties
- Complete assignment without assistance
- Complete assignment within two weeks of attending the class.
- Save the file as Wilcom52CA.emb and email using this link
Tasks
- Insert the art (see download instructions below)
- Using the two rectangles create two separate Auto Appliqué objects.
- Guide Run
- Pre-cut = On
- Stitch length = 2.5mm
-
- Tack
- Stitch type = Zigzag
- Spacing = 3.0mm
- Count = 1
- Offset = 100% inside
- Cover
- Width = 5.0mm
- Offset = 80%
- Frame out
- Partial Appliqué
- Using Partial Appliqué remove the over lap area of the background Auto Appliqué object
Downloads
- To download class assignment file
- Click on the download link below
- When asked, select Run
- When asked about security verification, select Run
- Accept the license agreement by selecting Yes
- The file Wilcom52CA.cdr will be saved in the C:\EDSOnline folder once you select Unzip
- You will receive the message 1 file(s) unzipped successfully
- If the self-extracting program does not close automatically, select Close
- Insert the file in Wilcom as normal
- To download the associated file Click here
Return to Menu
|
